环境说明:
| 操作系统 | 主机名 | IP地址 | 服务 |
|---|---|---|---|
| Centos8(zabbix服务端) | localhost | 192.168.91.134 | zabbix_server zabbix_agent |
| Centos8(zabbix客户端,MySQL从库) | web | 192.168.91.137 | zabbix_agent mariadb |
| Centos8(MySQL主库) | mariadb | 192.168.91.129 | maridab |
监控MySQL主从状态
安装Mariadb配置主从
部署主库
//安装mariadb
[root@mariadb ~]# dnf -y install mariadb*
//设置开机自启,并开启它
[root@mariadb ~]# systemctl enable --now mariadb
[root@mariadb ~]# mysql    初始状态的mariadb是没有密码的,需要修改root的密码
Welcome to the MariaDB monitor.  Commands end with ; or \g.
Your MariaDB connection id is 9
Server version: 10.3.28-MariaDB MariaDB Server

Copyright (c) 2000, 2018, Oracle, MariaDB Corporation Ab and others.

Type 'help;' or '\h' for help. Type '\c' to clear the current input statement.

MariaDB [(none)]> set password=password('123456');
Query OK, 0 rows affected (0.001 sec)

在主数据库里创建一个同步账号授权给从数据库使用
MariaDB [(none)]> grant replication slave on  *.*  to 'du'@'192.168.91.129' identified by '123456';
Query OK, 0 rows affected (0.000 sec)

MariaDB [(none)]> flush privileges;
Query OK, 0 rows affected (0.000 sec)

MariaDB [(none)]> select user,host from mysql.user;
+------+----------------+
| user | host           |
+------+----------------+
| root | 127.0.0.1      |
| du   | 192.168.91.137 |
| root | ::1            |
| root | localhost      |
| root | mariadb        |
+------+----------------+
5 rows in set (0.000 sec)


[root@mariadb ~]# vim /etc/my.cnf
[root@mariadb ~]# cat /etc/my.cnf
....
[mysqld]
log-bin = mysql-bin
server-id = 20

[root@mariadb ~]# systemctl restart mariadb.service

[root@mariadb ~]# mysql -uroot -p123456 -e'show master status;'
+------------------+----------+--------------+------------------+
| File             | Position | Binlog_Do_DB | Binlog_Ignore_DB |
+------------------+----------+--------------+------------------+
| mysql-bin.000001 |      328 |              |                  |
+------------------+----------+--------------+------------------+
部署从库
[root@web ~]# dnf -y install mariadb*
[root@web ~]# systemctl enable --now mariadb.service
[root@web ~]# mysql
Welcome to the MariaDB monitor.  Commands end with ; or \g.
Your MariaDB connection id is 9
Server version: 10.3.28-MariaDB MariaDB Server

Copyright (c) 2000, 2018, Oracle, MariaDB Corporation Ab and others.

Type 'help;' or '\h' for help. Type '\c' to clear the current input statement.

MariaDB [(none)]> set password=password('123456');
Query OK, 0 rows affected (0.000 sec)

MariaDB [(none)]> exit

[root@web ~]# vim /etc/my.cnf.d/mariadb-server.cnf
[root@web ~]# cat /etc/my.cnf.d/mariadb-server.cnf
[mysqld]
server-id=30
relay-log=mysql-relay-bin

[root@web ~]# systemctl restart mariadb.service

[root@web ~]# mysql -uroot -p123456
Welcome to the MariaDB monitor.  Commands end with ; or \g.
Your MariaDB connection id is 17
Server version: 10.3.28-MariaDB MariaDB Server

Copyright (c) 2000, 2018, Oracle, MariaDB Corporation Ab and others.

Type 'help;' or '\h' for help. Type '\c' to clear the current input statement.
MariaDB [(none)]> change master to
    -> master_host='192.168.91.129',
    -> master_user='du',
    -> master_password='123456',
    -> master_log_file='mysql_bin.000001',
    -> master_log_pos=328;

MariaDB [(none)]> show slave status\G
*************************** 1. row ***************************
.........
              Slave_IO_Running: Yes
             Slave_SQL_Running: Yes
配置监控脚本
agentd端
[root@web ~]# cd /scripts/
[root@web scripts]# vim mysql_status.sh
[root@web scripts]# cat mysql_status.sh
#!/bin/bash

count=$(mysql -uroot -p'123456' -e "show slave status\G" | grep "Running:" | grep -c 'Yes')

if [ $count -ne 2 ];then
                echo '1'
else
                echo '0'
fi

[root@web scripts]# chmod +x mysql_status.sh
[root@web scripts]# ll mysql_status.sh
-rwxr-xr-x 1 root root 169 Sep 12 18:11 mysql_status.sh
[root@web scripts]# vim /usr/local/etc/zabbix_agentd.conf
UnsafeUserParameters=1
UserParameter=check_mysql_status,/bin/bash /scripts/mysql_status.sh
//重启服务,生效配置
[root@web scripts]# pkill zabbix_agentd
[root@web scripts]# zabbix_agentd

zabbix_server服务端验证脚本
[root@localhost local]# zabbix_get -s 192.168.91.137 -k check_mysql_status
0
web界面添加监控项
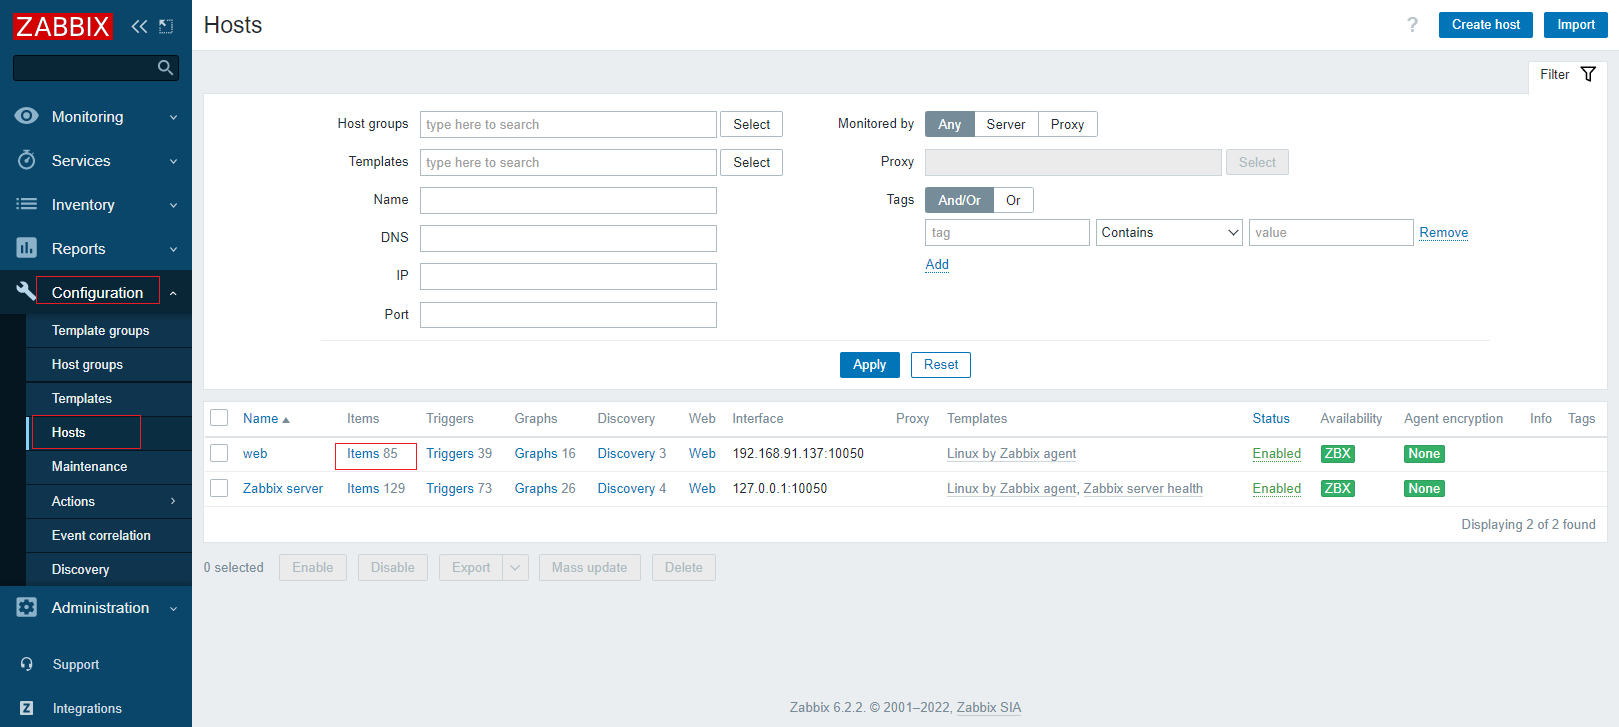
在配置栏的【Hosts】界面选择给哪台主机添加监控项,点击【items】

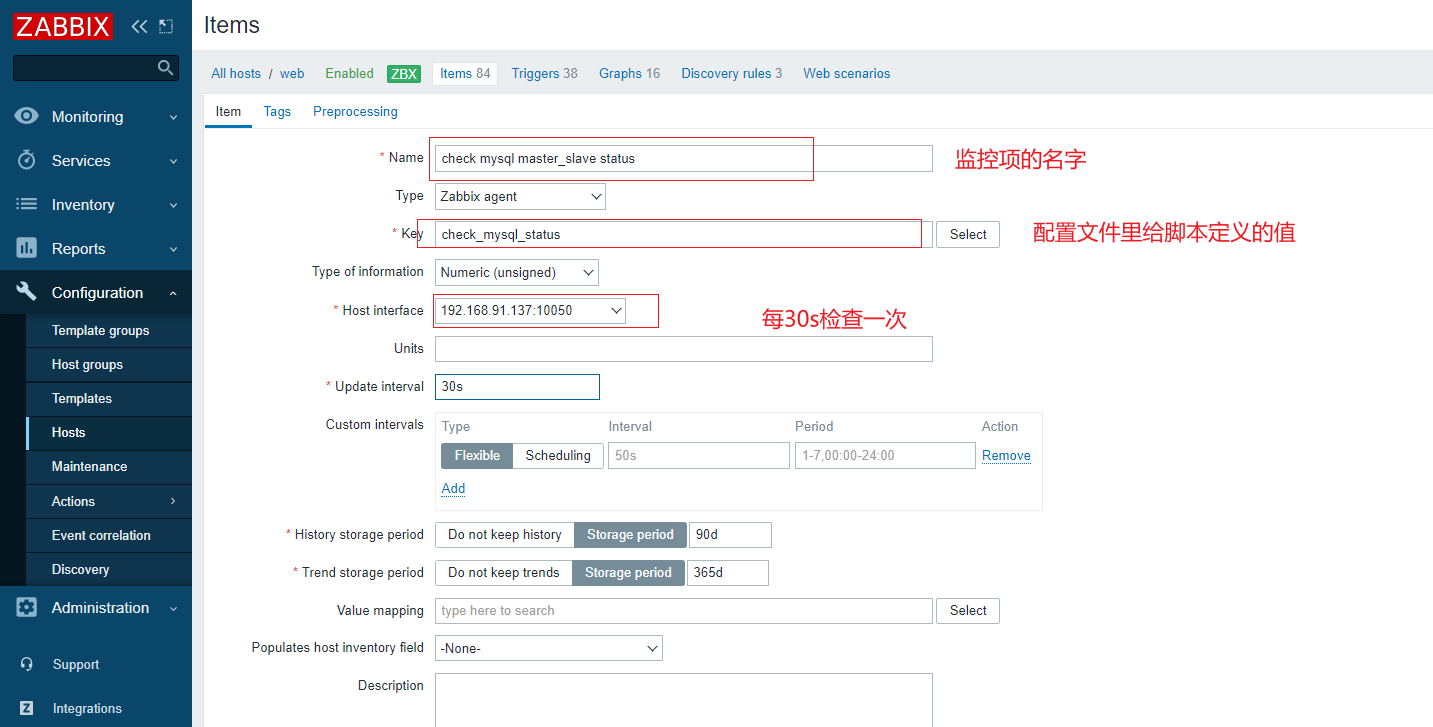
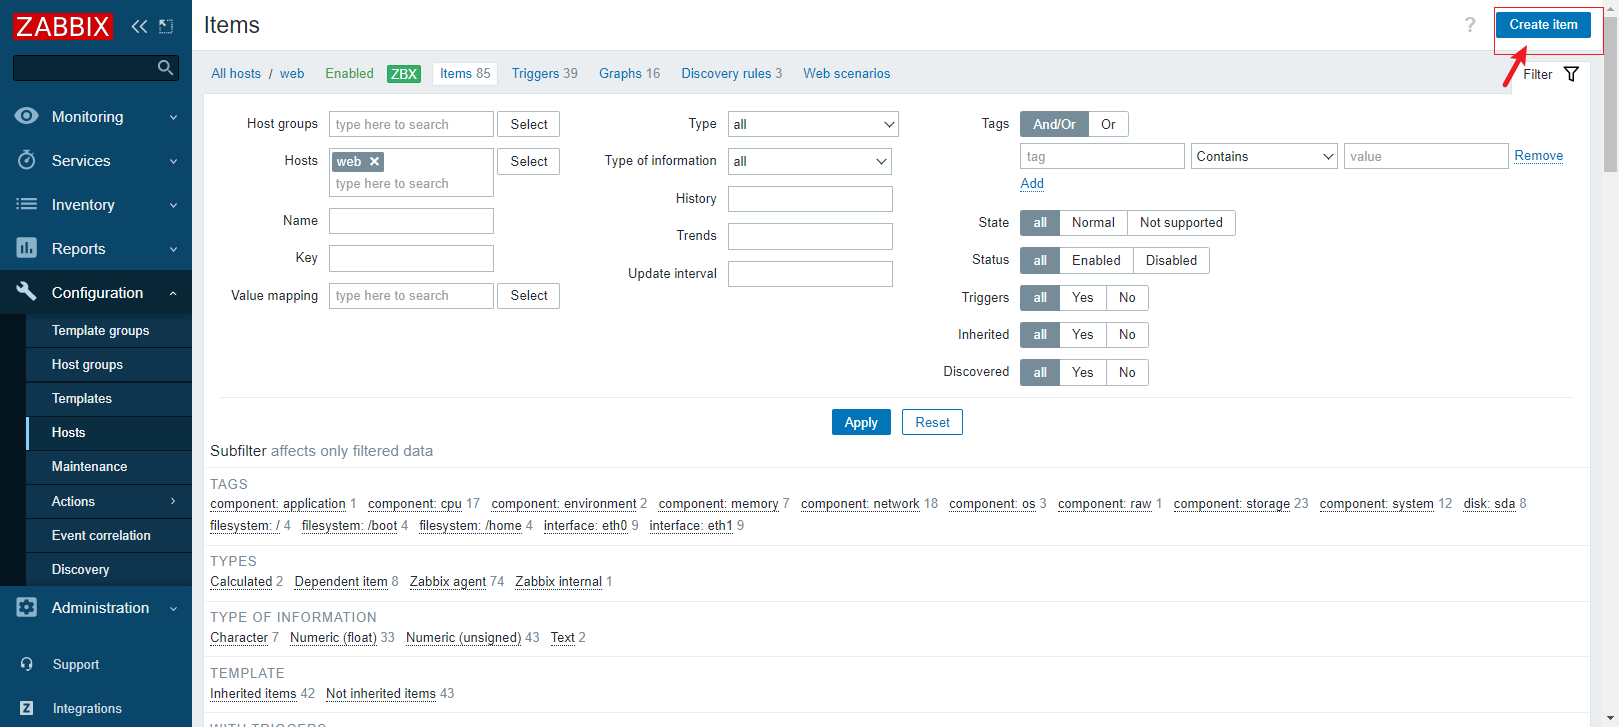
进入【items】界面后点击右上角的【Create item】创建监控项
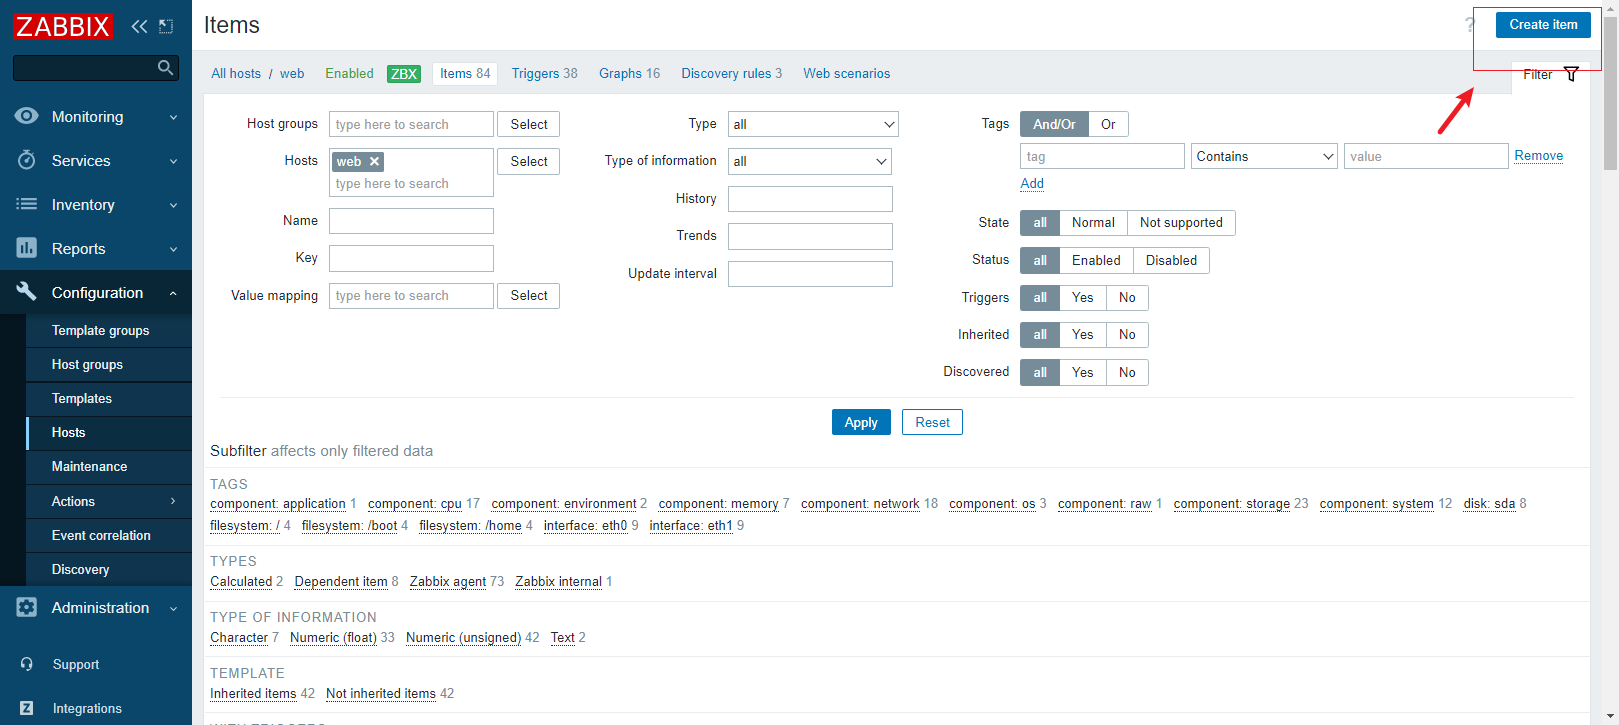
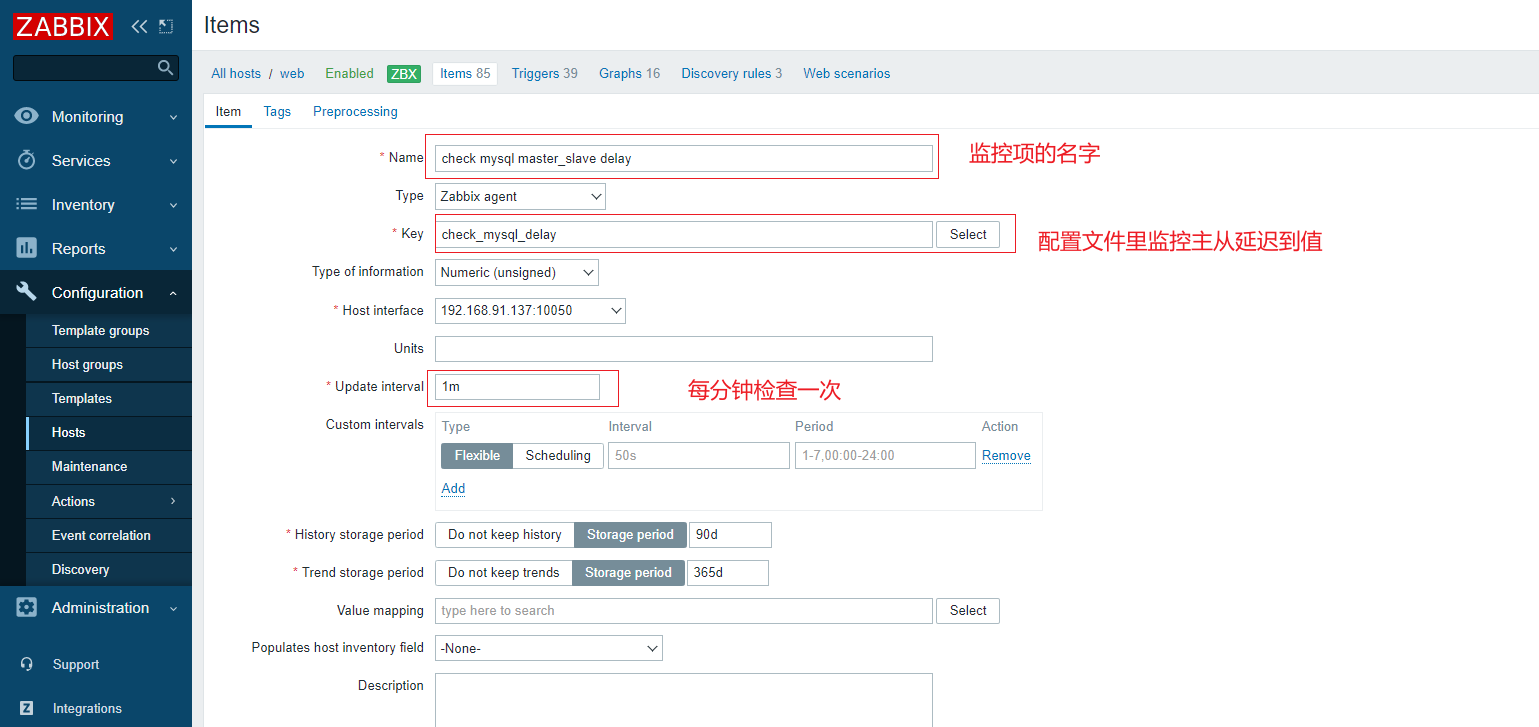
这里的key就是配置文件里给脚本定义的check_mysql_status
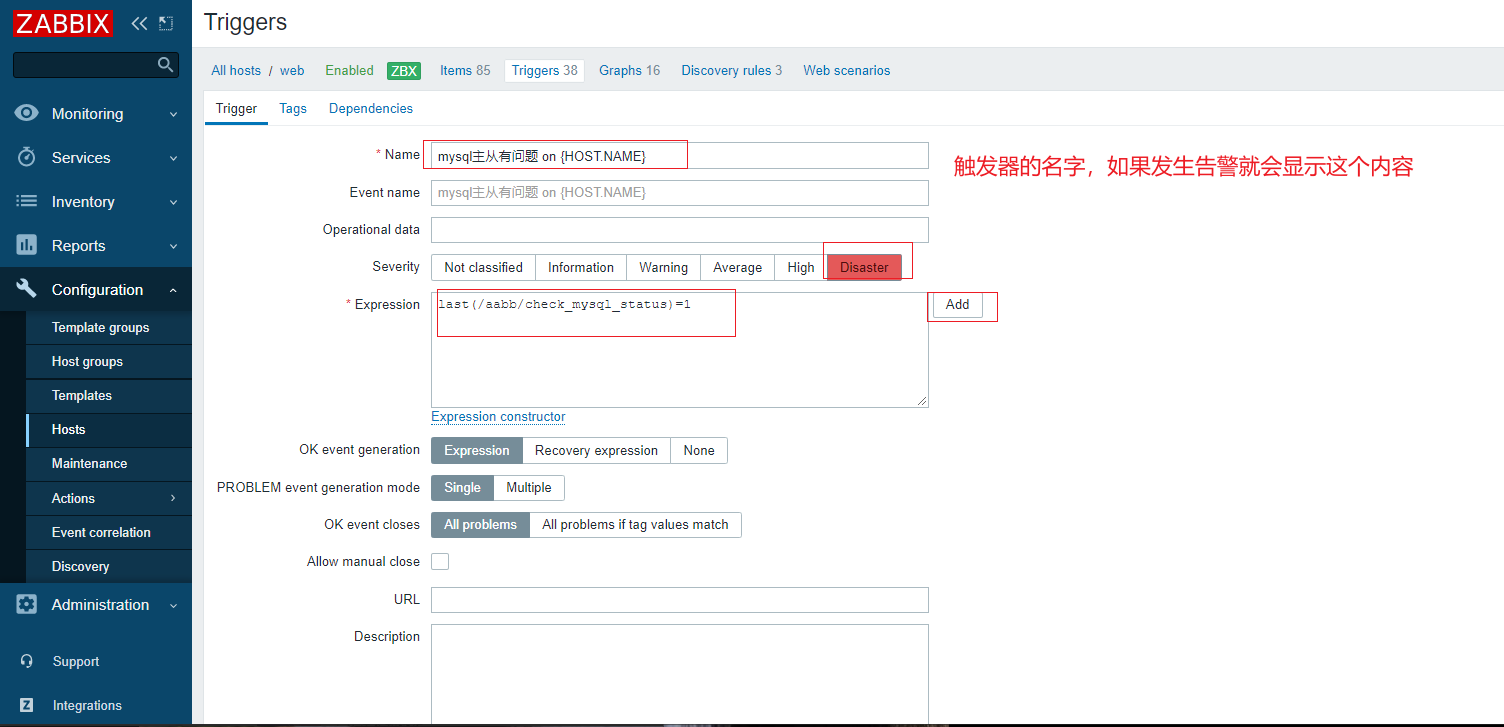
添加触发器
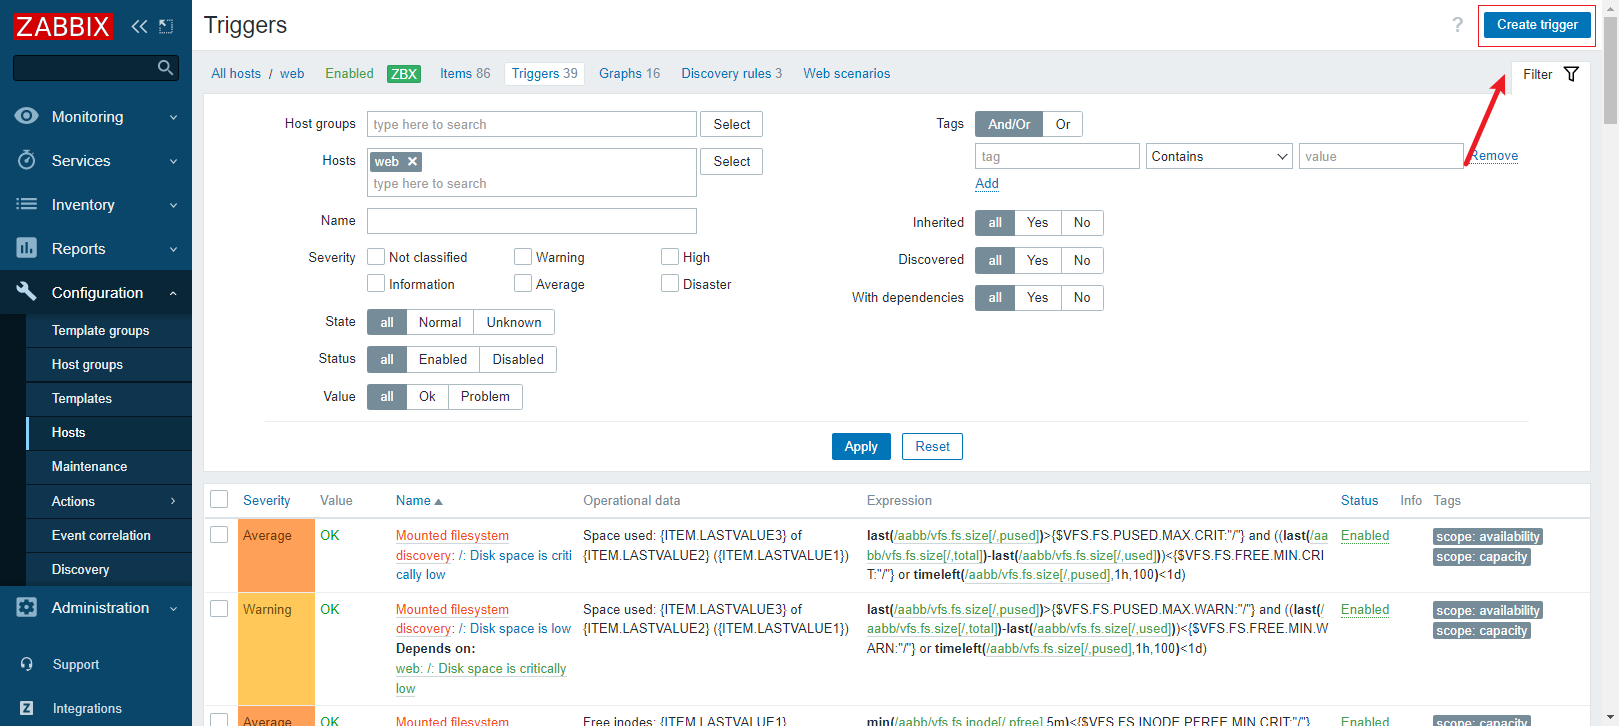
在配置栏的【Hosts】界面选择给哪台主机添加监控项,点击【Triggers】

进入【Triggers】界面后,点击右上角的【Create trigger】创建触发器
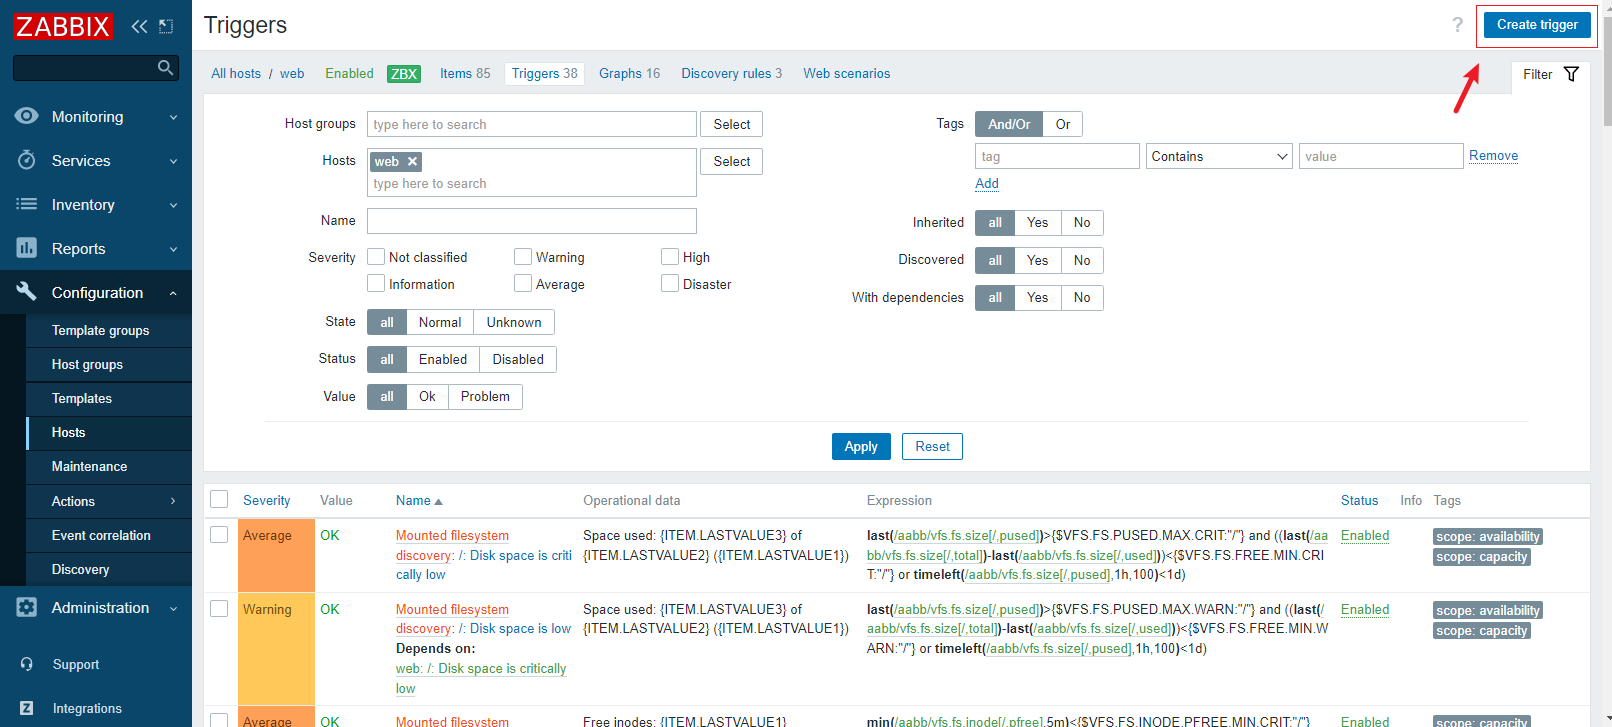
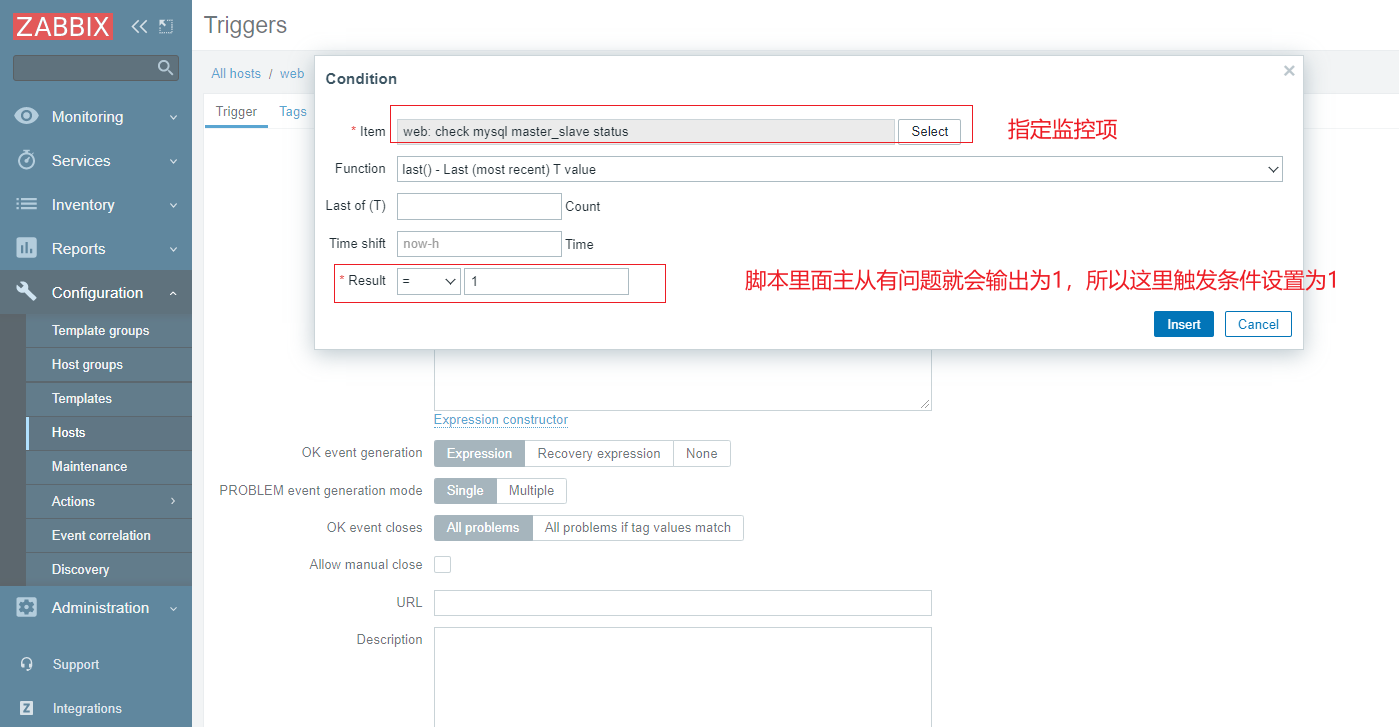
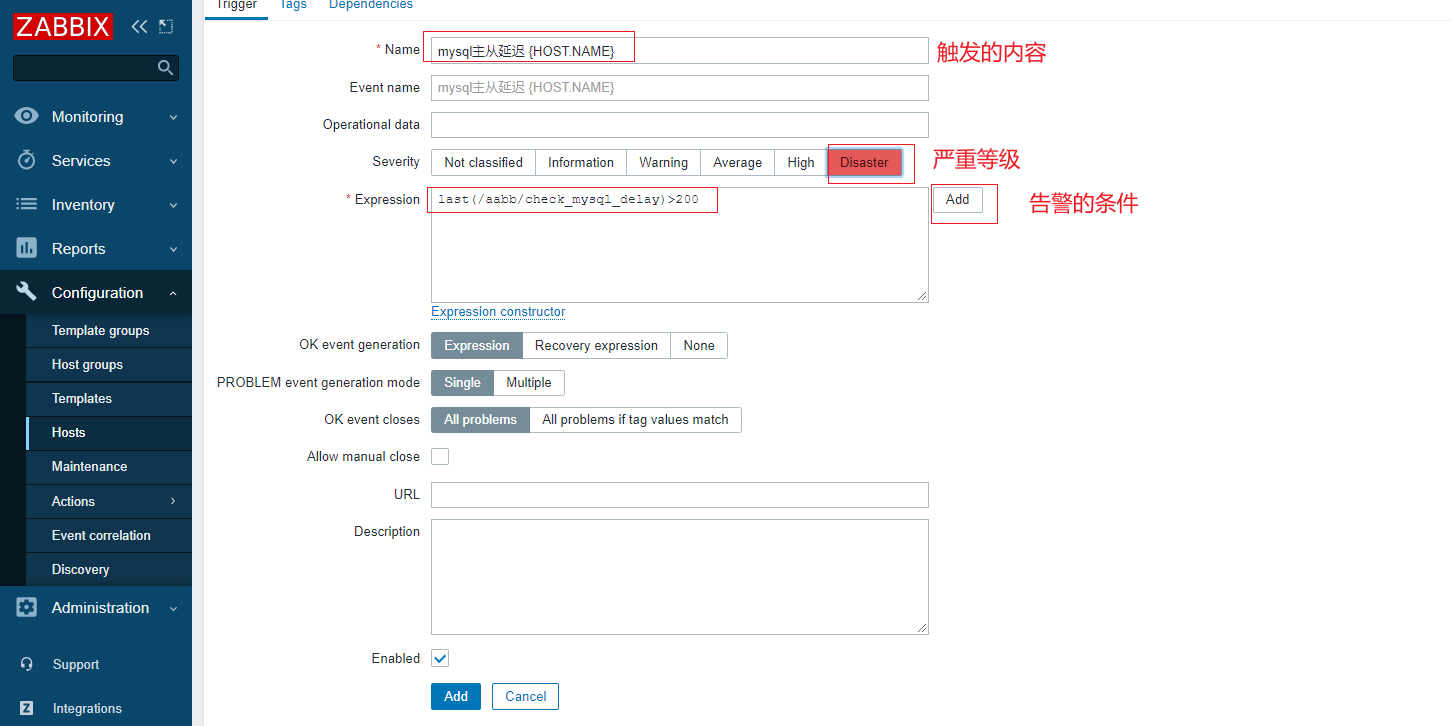
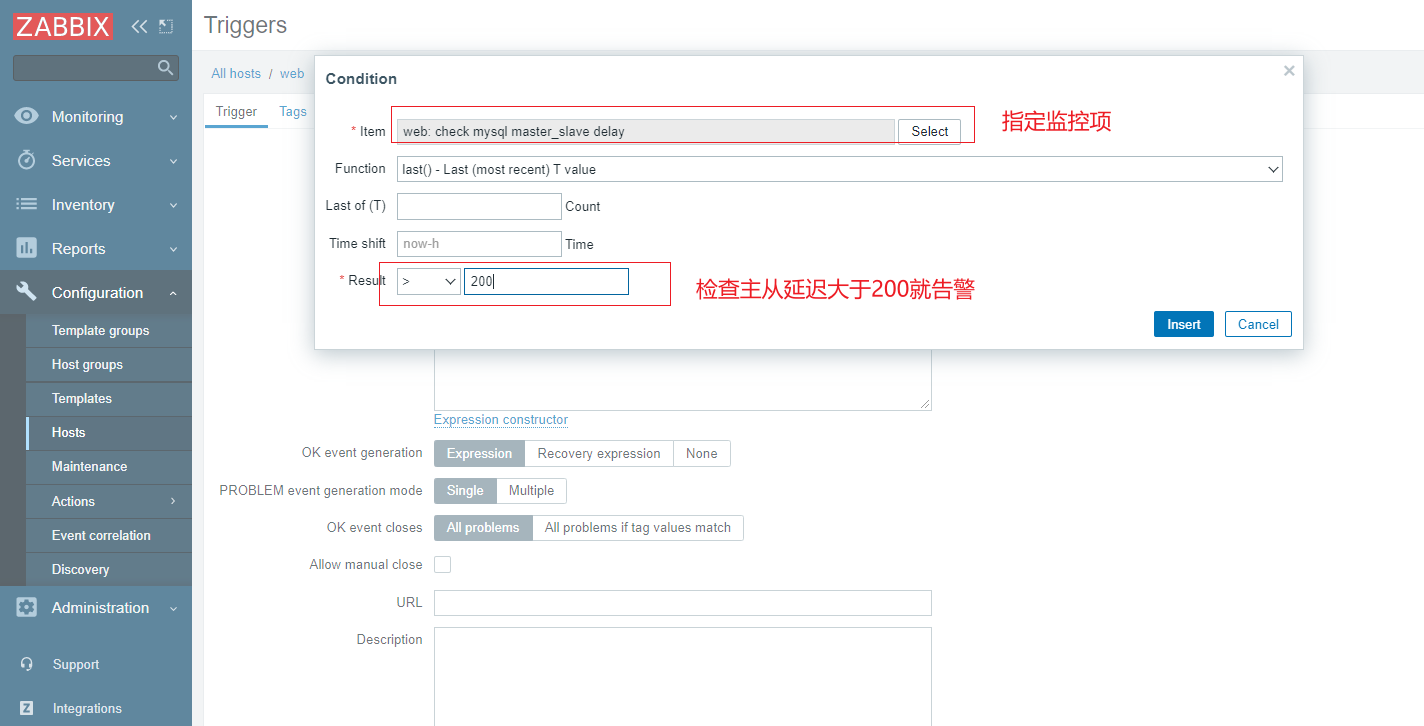
表达式的内容是先点击右边的【Add】进行添加的,添加的内容在下一张图中
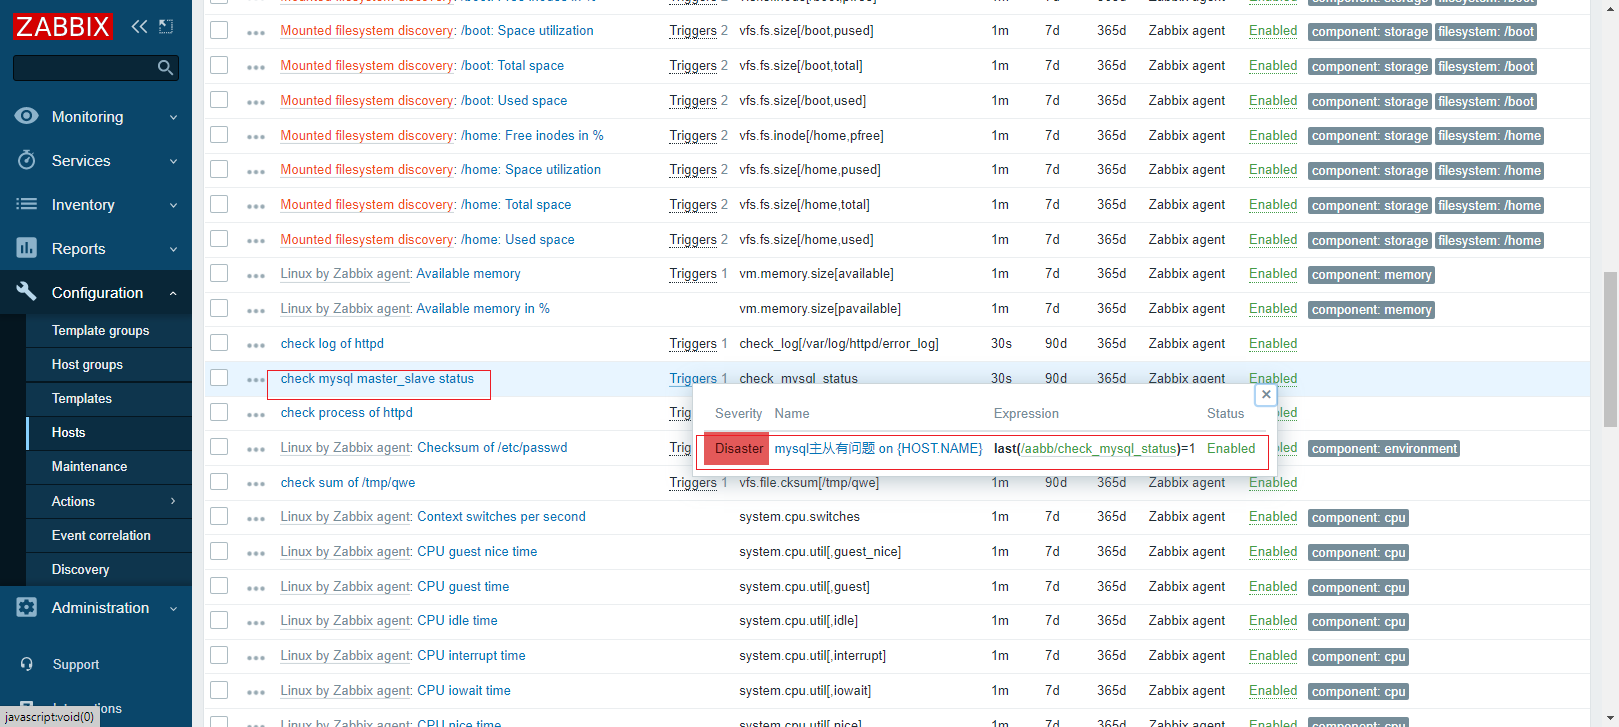
进入配置栏的【Hosts】界面后点击【items】。可以看到这条监控项有了一个触发器。
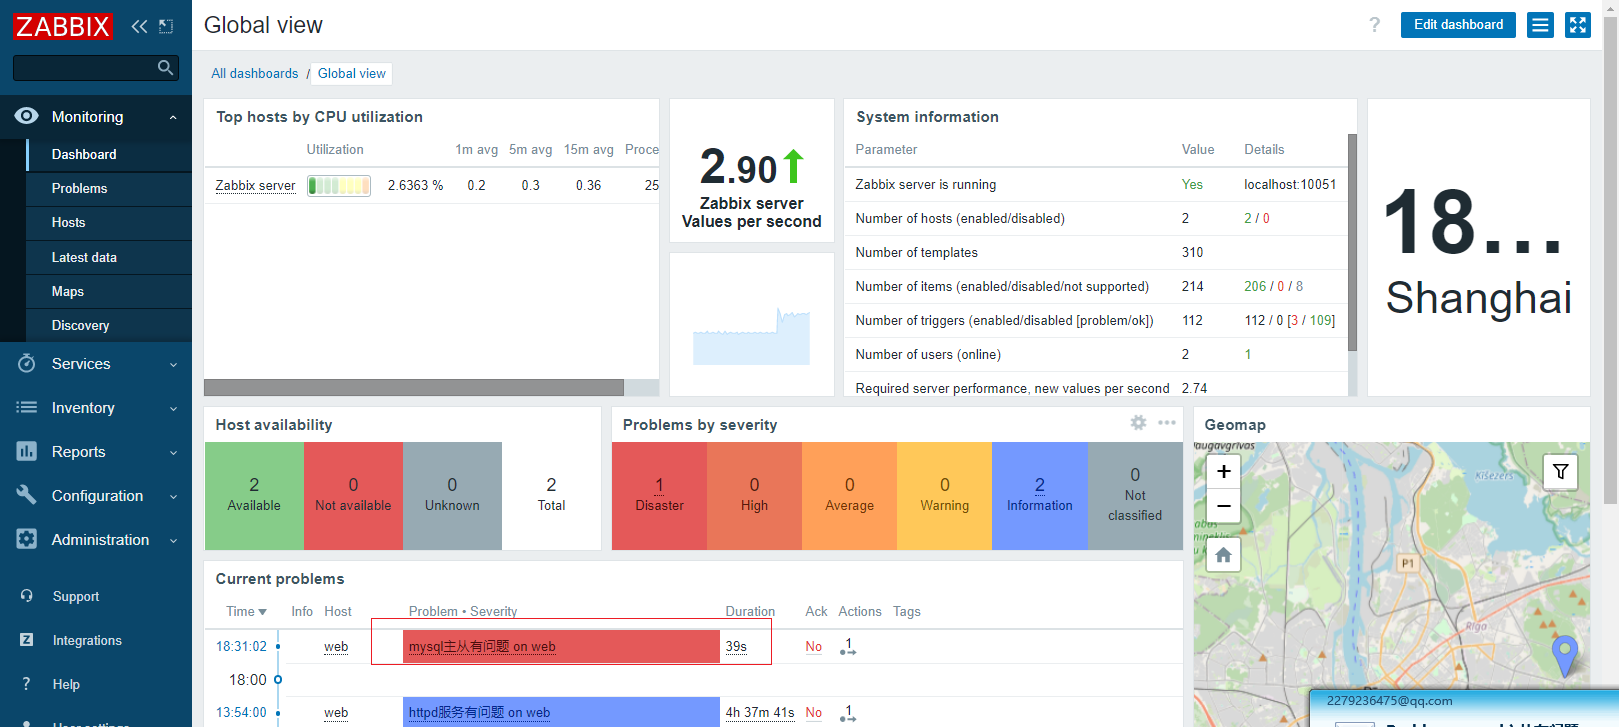
触发验证
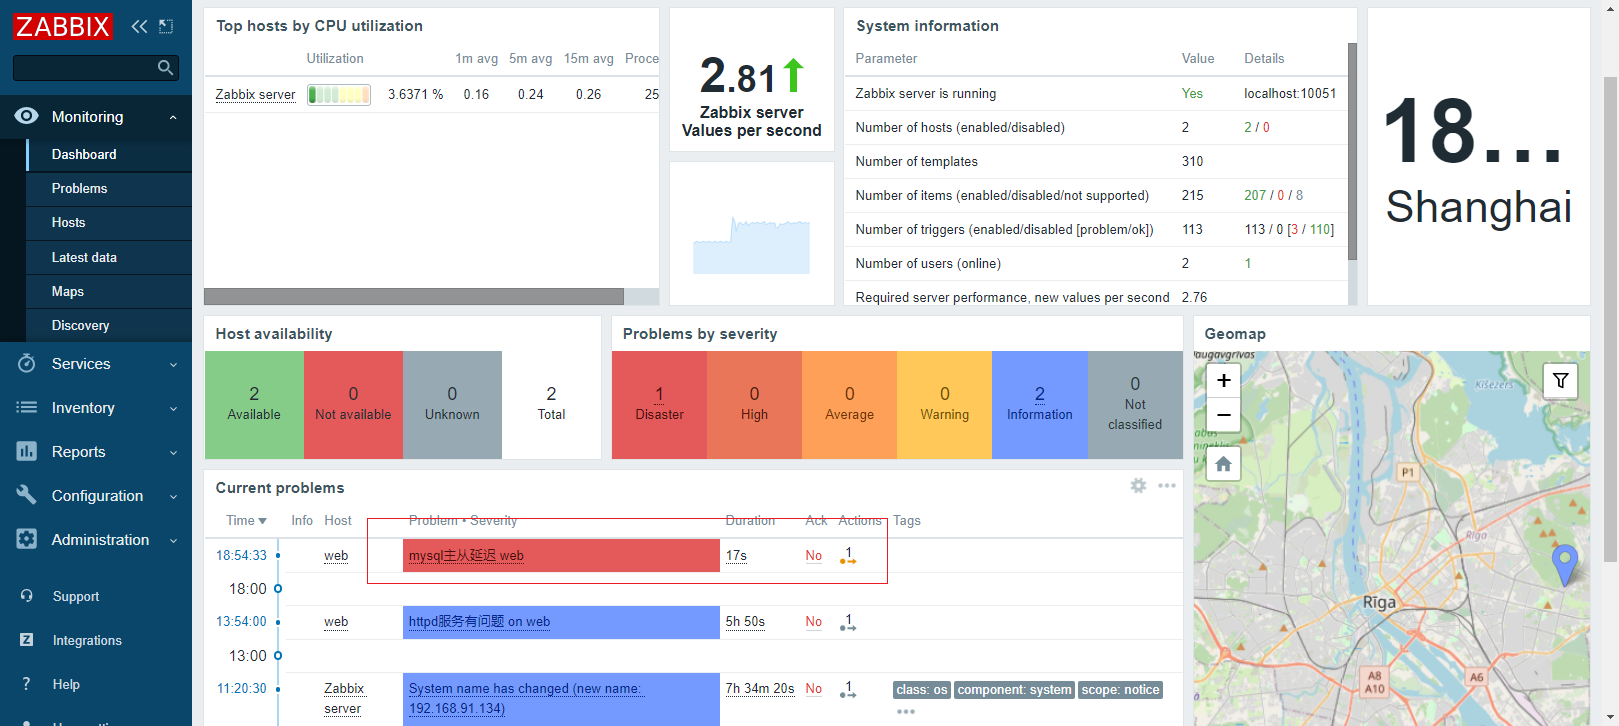
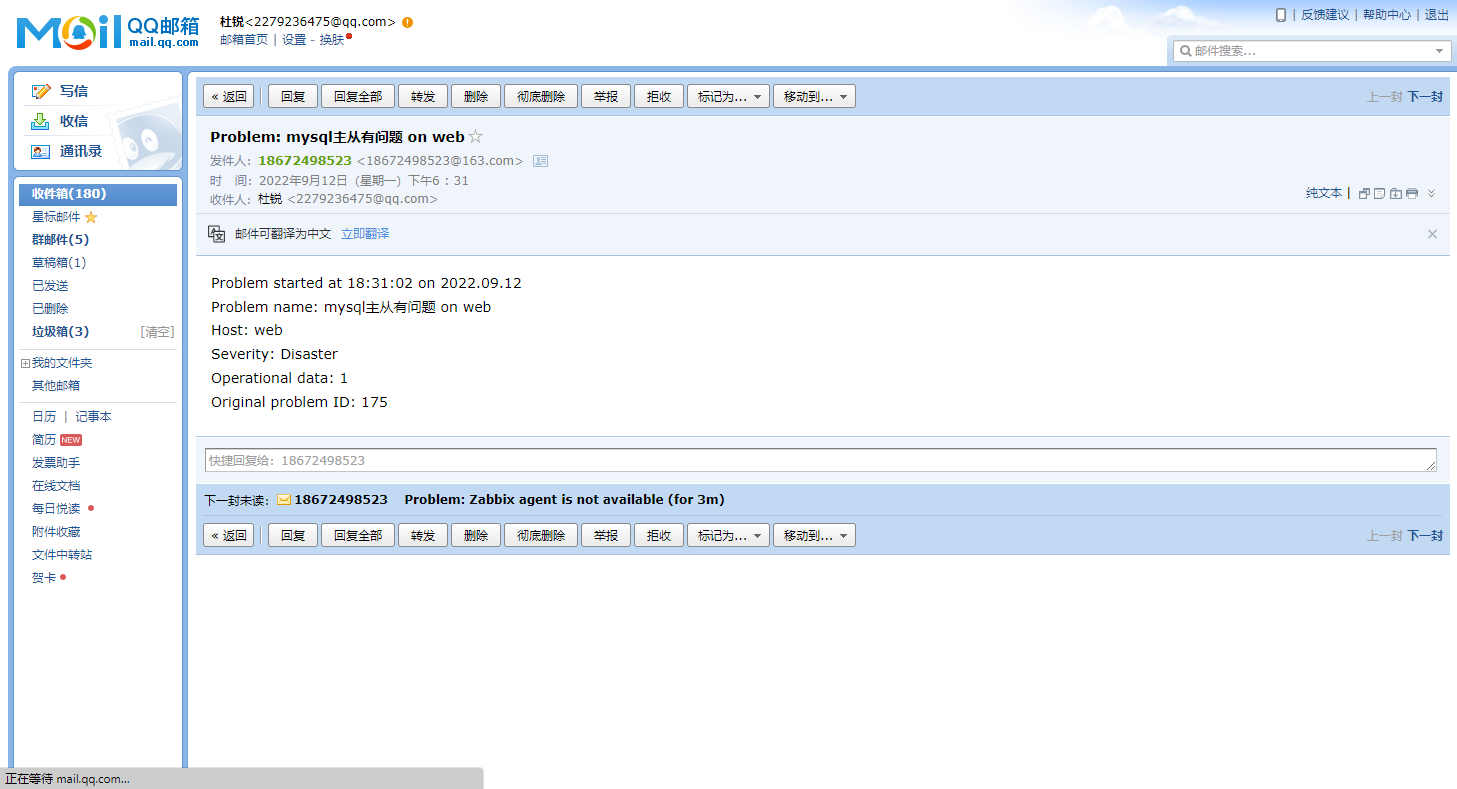
手动触发在从库上关闭主从
[root@web ~]# mysql -uroot -p123456 -e 'stop slave;'
可以看到发出警告了
监控MySQL主从延迟
配置监控脚本
[root@web ~]# cd /scripts/
[root@web scripts]# vim mysql_delay.sh
#!/bin/bash

delay=$(mysql -uroot -p123456 -e "show slave status\G" 2> /dev/null | awk '/Seconds_Behind_Master/ {print $2}')

echo $delay

给脚本执行权限
[root@web scripts]# chmod +x mysql_delay.sh
[root@web scripts]# ll mysql_delay.sh
-rwxr-xr-x 1 root root 139 Sep 12 18:34 mysql_delay.sh
[root@web scripts]# vim /usr/local/etc/zabbix_agentd.conf
UnsafeUserParameters=1
UserParameter=check_mysql_delay,/bin/bash /scripts/mysql_delay.sh

重启服务,生效配置
[root@web scripts]# pkill zabbix_agentd
[root@web scripts]# zabbix_agentd

zabbix_server服务端验证脚本
[root@localhost ~]# zabbix_get -s 192.168.91.137 -k check_mysql_delay
0
//脚本获取的值与mysql主从延迟一致
//在生产环境中主从延迟不可能为0,最浅层次的来说也有网络波动
//客户端
[root@web scripts]# mysql -uroot -p123456 -e "show slave status\G" 2> /dev/null | grep 'Seconds_Behind_Master'
         Seconds_Behind_Master: 0
zabbix.server服务端web页面添加监控项
在配置栏的【Hosts】界面选择给哪台主机添加监控项,点击【items】
进入【items】界面后点击右上角的【Create item】创建监控项
这里的key就是配置文件里给脚本定义的check_mysql_delay
添加触发器
在配置栏的【Hosts】界面选择给哪台主机添加监控项,点击【Triggers】。

进入【Triggers】界面后,点击右上角的【Create trigger】创建触发器
表达式的内容是先点击右边的【Add】进行添加的,添加的内容在下一张图中。
图片中是演示在企业的生产环境中的触发器配置,主从延迟大于200就说明出问题了,具体这个值的触发条件设置根据公司要求而定。
在实验环境下,无法手动触发主从延迟大于200,所以把值的触发条件设为0用来验证最终告警效果。
触发报警
因为无法把主从延迟搞到大于200所以只能把触发条件设为0用于验证触发器配置是否无误,我的mysql主从延迟本身就是0,